New to Weever? See how Weever helps manufacturers digitize and automate frontline operations →
Refreshing your data in Power BI can sometimes take over 15 minutes based on the amount of data that is refreshed. You can reduce this time significantly by using Incremental Refresh rate. Incremental Refresh updates only recent data within a specific date range, rather than reloading the entire dataset. Sound good? Here's how its done.
Step 1: Create Data Parameters
Load a Weever form into Power BI and create Start and End date range parameters for the data. This is what the Incremental Refresh function will use to determine what to refresh and what to archive.
Step 2: Filter Form Created Date by your Data Parameters
Set up the Form Created Date column to be filtered by the date range parameters you created.
Step 3: Enable Incremental Refresh
Enable the Incremental Refresh function to Archive old data and refresh recent data.
Step 1:
Create Data Parameters
Load a Weever form into Power BI and create Start and End date range parameters for the data. This is what the Incremental Refresh function will use to determine what to refresh and what to archive.
1.1: Open Power BI Desktop, load your Weever data, then click on Transform Data. 
1.2: Click on Manage Parameters under Home tab and then click on New Parameter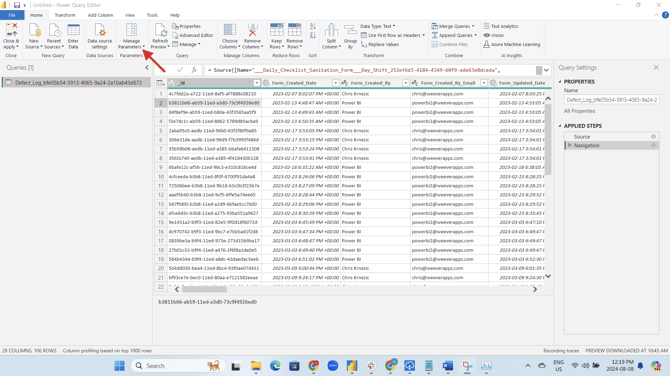
1.3: Create 2 Parameters, one for the start of the date range you'd like the data to be refreshed, and one for the end of that date range. These parameters must be named exactly ‘RangeStart’ and ‘RangeEnd’ for Power BI to recognize them.
- For the Range Start Parameter add this information:
- Name: RangeStart
- Type: Always ‘Date/Time’
- Suggested Values: Always ‘Any Value’
- Current Value for Range Start: Start Date from when you’d like to extract the data could be any number of years. Should be in YYYY-MM-DD HH:MM:SS AM/PM (ie. 2019-01-01 12:00:00 AM)

- Tap OK
- Tap "New" to make another parameter for the end range
- For the Range End Parameter add this information:
- Name: RangeEnd
- Type: Always ‘Date/Time’
- Suggested Values: Always ‘Any Value’
- Current Value for Range End: End Date should be greater than today (Recommended: 2 years from today). Should be in same format as Range Start. Should be in YYYY-MM-DD HH:MM:SS AM/PM (i.e. 2028-01-01 12:00:00 AM)

- Tap OK
- Then tap Close & Apply
Step 2:
Filter Form Created Date by your Data Parameters
Set up the Form Created Date column to be filtered by the date range parameters you created.
2.1: Select your form from Queries Pane 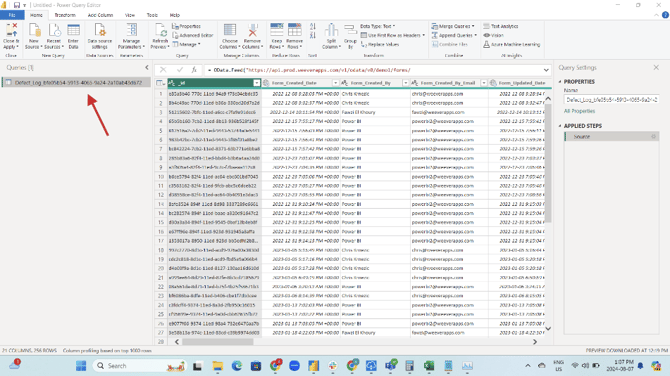
2.2: Update the Data Type of the date columns (Form Created Date & Form Updated Date) to be in Date/Time format.

2.3: Click on the filter arrow beside the ‘Form Created Date’ column, then tap Date/Time Filters, then tap Custom Filter (in most cases, it will be at the bottom of the list).
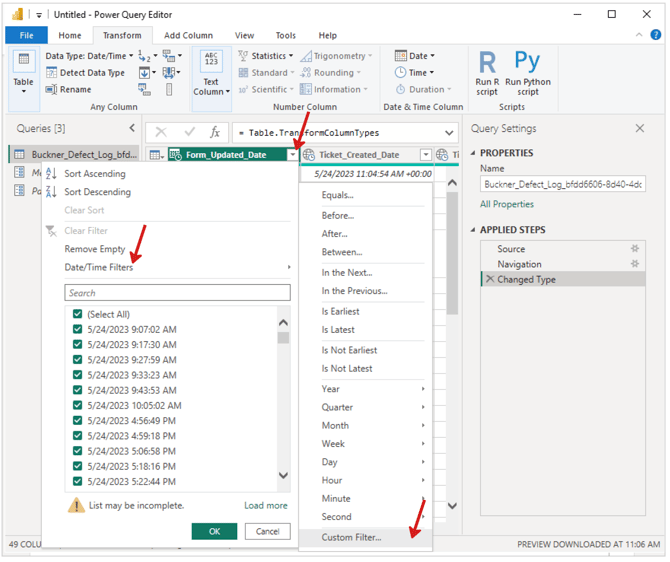
2.4: Complete the details exactly as shown in the image below. Click on the circled box and select Parameter instead of Date/Time which will be pre-selected.
The filter should read: is after or equal to RangeStart And is before RangeEnd.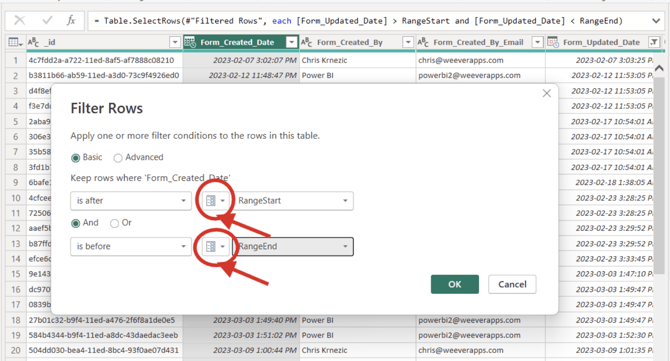
2.5: IMPORTANT: Only apply this filter to Form Created Date. Do not filter Form Updated Date by these parameters. Filtering both columns can cause edited submissions to disappear from your report.
NOTE
Form Created Date = Date of Form Submission
Form Updated Date = Date the Submission was Updated (edited)
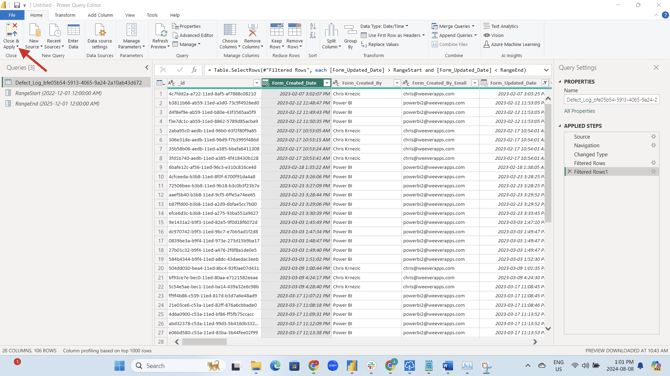
2.6: Once done, click on File / Close & Apply
Step 3:
Enable Incremental Refresh
Enable the Incremental Refresh function to Archive old data and refresh recent data.
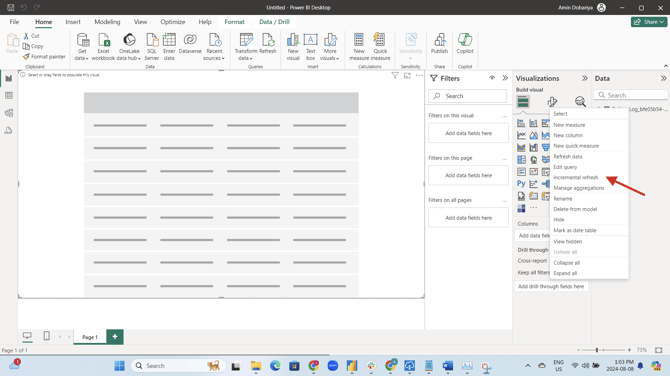
3.1: Right click or tap the three dots next to your form name in the Data pane and tap Incremental Refresh.
3.2: Select respective table and turn-on Incremental Refresh.
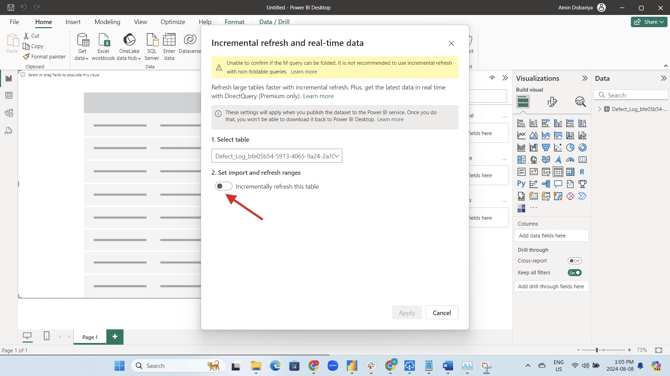
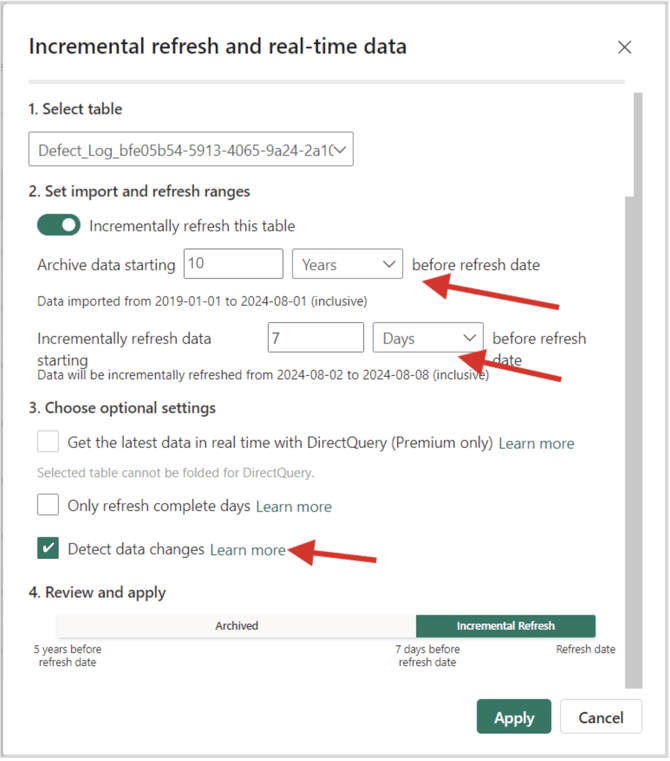
3.3: Enter number of years for which you’d like to see archived Data and for how many days you’d like to do incremental refresh.
- Number of Years: 10 Years (Recommended)
- Number of Incremental Refresh Days: 7 Days (Recommended)
- Detect Data Changes: Optional. If turned on, select Form Updated Date.
Number of Years & Number of Incremental Refresh Days : These settings will archive data from last 10 years and will only refresh submissions created within the last 7 days. This will speed up the refresh time and significantly reduce the load on our server as you will only be requesting required data and not all of the data during every scheduled refresh. Archived Data can be re-added anytime. Archived data won't be downloaded again from the server - only new data will be.
Detect data changes: Power BI checks the latest Form Updated Date for each day in your refresh window and skips any day with no changes, which further speeds up refresh. Select Form Updated Date for this setting. It must be a different column from the one filtered by your RangeStart/RangeEnd parameters, which is why only Form Created Date is filtered in Step 2.
Editing older submissions: Edits made to submissions older than your refresh window (for example, a form submitted 3 weeks ago and edited today) won’t appear in your report until the next full refresh. If your team regularly edits older submissions, increase the number of incremental refresh days to cover how far back forms are typically edited.
Archived Data: Yes it can be re-added anytime. Archived data won't be downloaded again from the server - only new data will be.
3.4: Click Apply and publish report to respective workspace and turn on Scheduled Refresh.
And that's it!
Now you know how to setup incremental refresh rates for reports!